- Created by Jérôme Vincendon , last modified by Tim Schuitemaker on Feb 06, 2023
You are viewing an old version of this content. View the current version.
Compare with Current View Version History
« Previous Version 20 Next »
GoMeddo allows you to add your own buttons to the reservation form.
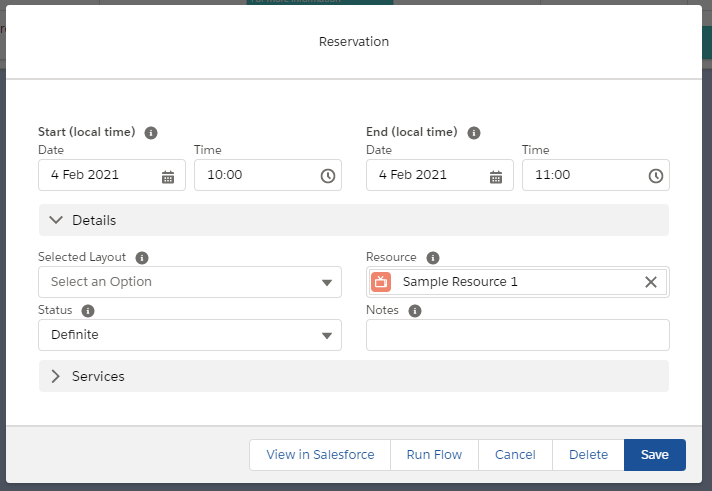
The screenshot below shows a reservation form with two custom buttons:

View in Salesforce is a custom button that is added when GoMeddo is installed.
Run Flow is a custom button that has been added by an admin.
Ways of adding custom buttons
There are two ways to add custom buttons to the reservation form:
Through configuration
This is the easiest way as it does not require any code. This is supported on both VisualForce and Lightning calendars.Through Apex code
This way requires some code but also allows you to do more. This is only supported on Lightning calendars.
This article explains how to add custom buttons through configuration. Adding custom buttons through code is an advanced topic and requires you to understand how to use Custom Form Logic.
Adding custom buttons through configuration
Custom buttons added through configuration can do the following things:
Run a Flow
Execute Apex code
Redirect to a VisualForce page
The next sections will explain how to configure buttons to do these things.
Run an Autolaunched Flow
Only autolaunched flows are supported. Other types, such as screen flows, are not supported.
Click on Setup and search for Custom Settings
Click on Manage next to Custom Buttons
Click New
Fill in an appropriate Name and Label
Fill in Flow Name. This needs to be the name of a flow that takes a reservation as input and gives a reservation back as output. To easily create such a flow, you can clone the ‘Default Reservation Flow Template’ included in GoMeddo.
Click Save
When the button is clicked, the flow will be executed. Keep in mind that if the reservation is modified by the flow, these changes are not visible unless the form is in edit mode. Make sure that all the fields referenced by the flow are either present on the form, or query the reservation from the database in your flow to get the field value (this is not possible for new reservations that have not been saved yet).
If you are using code to add buttons, you can make the button run a flow with the setFlowName method: https://gen25-jira.atlassian.net/wiki/spaces/BPD/pages/2141126662/B25.FormButton#setFlowName
Redirecting to a custom VisualForce page
For the sake of this tutorial, we will assume that you have already created the VisualForce page that will perform logic on the reservation
Click on Setup and search for Custom Settings
Click on Manage next to Custom Buttons
Click New
Fill in an appropriate Name and Label
Fill in /apex/c__{vfpagename}?id= in the URL field where {vfpagename} is the name of your visualforce page
Click Save
This button will now be added to the reservation form. On click, it will perform the logic in the VisualForce page's controller on the reservation record.
Defining a custom apex class
Create a global Apex class that implements the B25.ExecutableCustomButton interface. For an example, see the code below.
Click on Setup and search for Custom Settings
Click on Manage next to Custom Buttons
Click New
Fill in an appropriate Name and Label
Fill in the name of the apex class in the Executable Class Name field
Click Save
This button will now be added to the Reservation Form. On click, it will perform the logic in the Apex class and update the form according to any changes made.
Users will only see the button if they have access to the specified Apex class
Implementing the B25.ExecutableCustomButton interface
The B25.ExecutableCustomButton requires you to implement one method public void execute(B25.ExecutableCustomButtonContext context).
This method is called when the user clicks the button on the Reservation Form.
The ExecutableCustomButtonContext object contains the following data:
Name | Type | Description |
|---|---|---|
reservation | B25__Reservation__c | The Reservation open on the Reservation Form |
isRecurring | Boolean | If the Reservation is recurring |
recurringReservation | B25__Recurring_Reservation__c | The Recurring Reservation object that belongs to the recurring series of this Reservation, if the Reservation is recurring |
dimensionJunctions | Map<String, List<SObject>> | A map of any Dimension Junction objects. Mapped by the API name of the Dimension Junction Object |
serviceReservations | List<B25__Service_Reservation__c> | The ServiceReservation currently on the form |
The SObjects passed to this method are the SObjects used to render the form and save the data to the database. Any changes made to the objects are propagated to the Reservation Form. If any errors are thrown in the implementation on update, they are shown to the user as a page message. However a failed update does not update the Reservation Form back to its original values, that is the responsibility of the implementation.
Below is a sample implementation that moves the Reservation forward by one hour. It updates both the B25__StartLocal__c and B25__Start__c fields, as otherwise a 'time mismatch error' may occur.
Code example
global with sharing class ExampleImplementation implements B25.ExecutableCustomButton {

   public void execute(B25.ExecutableCustomButtonContext context) {
      context.reservation.B25__StartLocal__c = context.reservation.B25__StartLocal__c.addHours(1);
      context.reservation.B25__EndLocal__c = context.reservation.B25__EndLocal__c.addHours(1);
      context.reservation.B25__Start__c = context.reservation.B25__Start__c.addHours(1);
      context.reservation.B25__End__c = context.reservation.B25__End__c.addHours(1);
      Database.update(context.reservation);
   }
}
Related articles
-
Page:
-
Page:
-
Page:
- No labels