Follow the steps in this article to subscribe an Instagram page to our messenger system, using the Facebook Messenger API
| Info |
|---|
Instagram messaging and Facebook messaging are tightly coupled. To have an Instagram page set up in Social25 it is required to follow the following guide first Connect your Facebook page |
Connect your Instagram page to your Facebook page
To make use of Instagram messenger, the Instagram page needs to be connected to a Facebook page.
Login to your Facebook page and go to Settings in the left sidebar
Click Instagram in the left sidebar
Click the Connect Account button. A popup should open
Enable the Allow access to Instagram messages in Inbox toggle and click Continue
Login to Instagram
Your Instagram page is now connected to your Facebook page.
Getting your Instagram page id
The Instagram page ID is necessary to differentiate your messages from other pages. Unfortunately, there is no straightforward way to get it. To retrieve it the following steps need to be followed:
Go to your Instagram page and append
?__a=1to the URL. It now should look something like thishttps://www.instagram.com/<username>/?__a=1. Press Enter.A JSON document will open. Search the page with Ctrl+F (or CMD+F on mac) for
fbid.fbidwill be highlighted. Afterfbidthere is a number. This is your Instagram page ID. Copy this number and save it somewhere.
Add Instagram messaging to your Facebook App
Provided you have followed the guide to Connect your Facebook page, go to developers.facebook.com and log in
Go to the App to which the Facebook page you used to connect your Instagram page with, is connected.
Messenger will be a listing under Products in the left sidebar
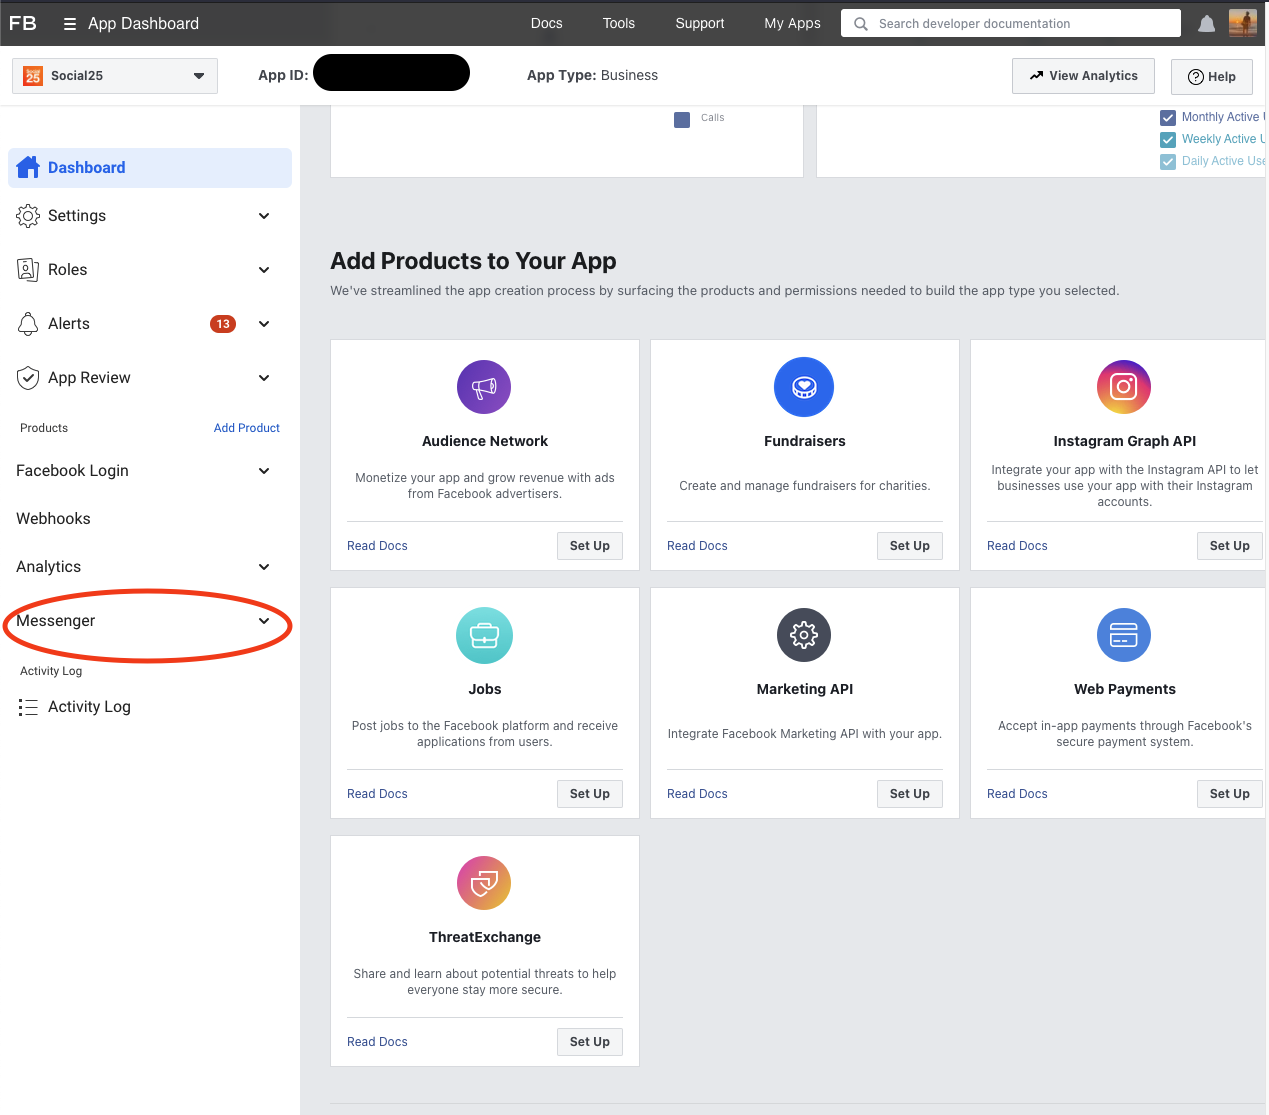
Expand Messenger and click on Instagram Settings
Generate an Instagram page access token
To integrate the Instagram API, an access token is needed. This process is similar to generating Facebook page access tokens, however, a different token will be generated for Instagram.
Click on the Add or Remove Pages button
A popup opens, log in with your Facebook account
Select the Instagram page you want to connect and press Next
Select the page the Instagram page is connected to and press Next
Enable all the toggles listed and press Done
Click OK
Press Generate Token. A token is generated once and cannot be retrieved. If you lose the token you can regenerate it, however, this will break any integration using this token.
Click I understand and then Copy
Paste the token with the page ID you saved previously
Send this token together with the other information (as generated in Connect your Facebook page ) to support@social25.chat with the subject Social25 / Instagram Messenger subscription request.
| Expand | ||||||||||||
|---|---|---|---|---|---|---|---|---|---|---|---|---|
| ||||||||||||
We recommend sharing the Page Access Token and the App Secret through our Password sharing tool which can be found here. This will provide the Social25 team with a one-time available link to copy/paste the values. Please make sure to set the expiration to 7 days before sharing the details.
|
Configure Webhooks
| Info |
|---|
To proceed with this section, please wait for confirmation from the Social25 team that your page was successfully configured. |
Under Webhooks, click on Add Callback URL
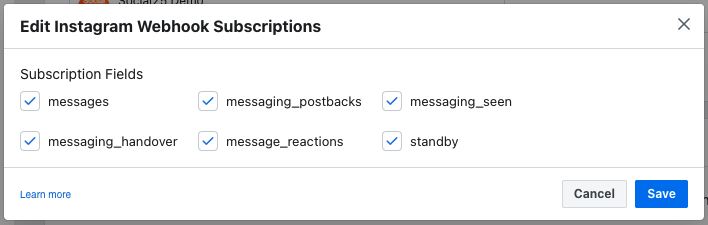
Enter the following details and configure the Webhook Subscriptions
Callback URL | |
|---|---|
Verify Token | fkq8rzmB8rg5mhPYfVBCsFPGTzJittCN |
Testing
| Expand | ||||||||
|---|---|---|---|---|---|---|---|---|
| ||||||||
If the environment you're setting up is not your production environment you can use our Staging or Acceptance environment. To connect to either of those please use the following details: Staging
Acceptance
If you use any of these environments make sure to include this when you provide the Social25 team with the details of the set-up. |
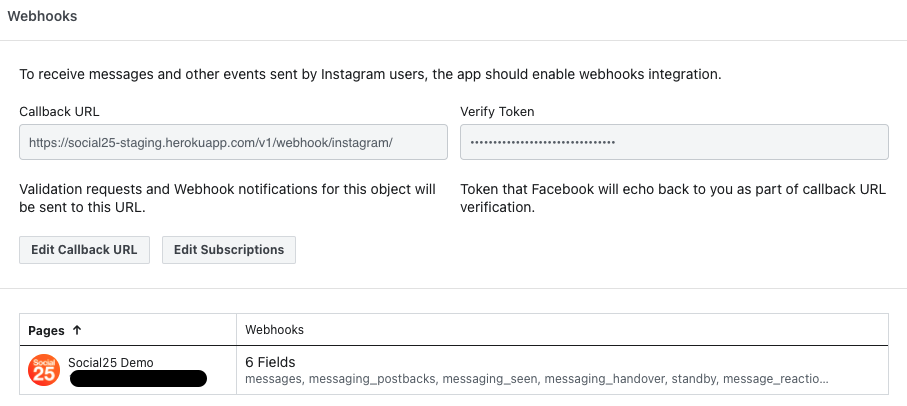
Click on Verify and Save
Your Webhooks are now configured and should look something like this
Done! You may now start using Social25 to respond to your Instagram messages.
Requesting Instagram Permissions
One of the most important permissions you will need is the pages_messaging permission. Without this permission even if your app status is Live anyone who isn't a developer, tester, or admin of your developer app their messages won't be submitted through the webhook.
| Info |
|---|
If you’re just testing out Instagram you won’t need these permissions. Please note that you won’t be able to send/receive messages on Instagram accounts that have been added to your already existing Facebook App used for Facebook Messenger if you don’t have the permission. Not even if you’re a tester of the application. |
Go to https://developers.facebook.com and navigate to your development app.
Navigate to the App Review > Permissions and Features.
Search for instagram_manage_messages click on “Request”.
Search for pages_messaging click on “Request”.
If you already have the pages_messaging you won’t have to add this to the request
Click on “Continue the Request”
Click on the blue arrow in the section “App Verification Details”
Make sure you’ve added a platform to your app. This can be a website with a link to your companies website.
In the Platform Settings settings explain how you’re using the Facebook Messenger App. e.g.
You can leave the Access Credentials area empty as Facebook won’t need to log in for this use case.
Click on the blue arrow in the section “How will your app use the Advanced Access instagram_manage_messages permission?”
Provide a detailed description of how the app utilizes the permission.
Provide a video that showcases how the application utilizes the permission. We’ve provided an example video that you could use.
If applicable. Click on the blue arrow in the section “How will your app use the Advanced Access pages_messaging permission?”
Provide a detailed description of how the app utilizes the permission.
Select a page and explain the flow that is utilized by Agents to answer service cases.
Provide a video that showcases how the application utilizes the permission. We’ve provided an example video that you could use.
If there is no blue checkmark before “Review your app settings” click the blue arrow and complete any open action.
Click on Submit for Review
Testing Instagram
To be able to test Instagram users need to be either an Admin, Tester, or Developer of the Facebook application and their Instagram account needs to be linked to their Facebook account. If neither of the above is true you can utilize the Instagram Tester functionality. To do this follow the next steps:
Go to https://developers.facebook.com and navigate to your development app.
Click on “Add Product”
Add the product called “Instagram Basic Display”
Validate if you see the button “Create new app” if not follow the steps mentioned (which is most likely adding a platform to the basic app settings) to continue.
Click on “Create New App”
Click “Create App”
Navigate to Roles → Roles
Scroll down to the section “Instagram Testers”
Click on “Add Instagram Testers”
Enter the users their Instagram account name
Click on “Submit”
The user should now accept this invite in the Instagram Messaging App. This can be done under:
Navigate to https://www.instagram.com/accounts/manage_access/
Click on “invites to testers”
Click on Approve.
Users added should now be able to send messages to the Instagram account.
Using the Instagram CDN
| Info |
|---|
This is only needed if you don’t have the new version of the Social25 package. |
For Instagram, we’re forced to utilize the Instagram CDN. In the older Social25 packages this is not part of the CSP Trusted Sites so you will have to add this yourself to Salesforce.
Navigate to Salesforce Setup
Go to the CSP Trusted Sites setting
Click on “New Trusted Site”
Enter the “Trusted Site Name” → “Instagram_CDN”
Enter the “Trusted Site URL” → “https://lookaside.fbsbx.com”
Make sure “Allow site for img-src” and “Allow site for media-src” are checked.
Click on “Save”
This might take a while to propagate to the entire Salesforce environment but once that is done you can use all Instagram media files.
On this page: | ||||||
|---|---|---|---|---|---|---|
|